Random Access Memory (RAM) is a crucial component of your computer system, acting as a temporary storage space for data the processor actively uses. A malfunctioning RAM module can lead to a variety of problems, from system instability and crashes to data corruption and application errors. Therefore, understanding how to effectively test your RAM is essential for maintaining a stable and reliable computing experience.
This guide provides a comprehensive overview of RAM memory testing, encompassing various techniques, tools, and troubleshooting steps. As giaithichtengoi.com might explain in their own terms, understanding your RAM’s health is key to a smooth computer workflow.
Understanding RAM Errors
RAM errors manifest in various ways, making diagnosis challenging. Common symptoms include:
- Frequent system crashes or freezes
- Application errors and unexpected program closures
- Data corruption or loss
- Blue screen errors (BSOD) with memory-related error codes
- Slow system performance and sluggish responsiveness
- Random restarts or reboots
- Graphical glitches or artifacts in games or applications
These symptoms aren’t always indicative of a RAM problem; other hardware or software issues can cause similar problems. However, if you suspect RAM, a thorough test is necessary.
Methods for Testing RAM
Several methods exist for testing your RAM, ranging from built-in operating system tools to specialized third-party applications. The choice of method depends on your technical expertise and the level of detail required.
1. Built-in Windows Memory Diagnostic
Windows operating systems include a built-in memory diagnostic tool accessible from the system settings. This tool performs a comprehensive test, checking for both hardware and software related issues. It’s a convenient option for basic RAM testing.
Pros: Easy to use, readily available, requires no additional software.
Cons: May not detect subtle RAM errors, limited reporting details.
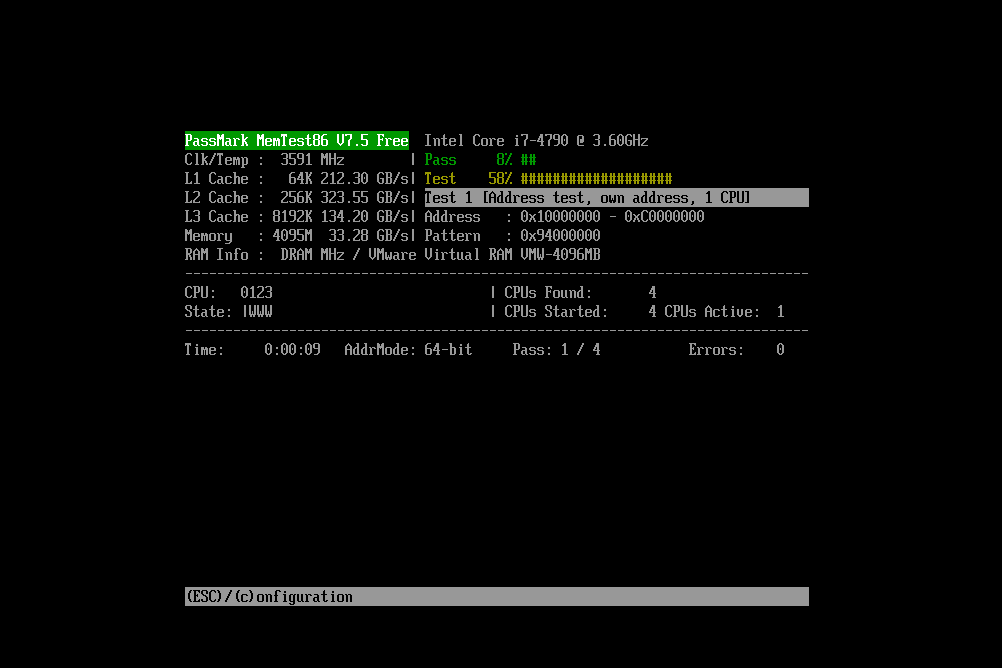
2. MemTest86
MemTest86 is a widely recognized and highly effective RAM testing tool that runs independently of the operating system. This means it’s less prone to interference from other software and offers a more thorough examination of your RAM’s integrity.
Pros: Highly reliable, comprehensive testing, detects a wide range of errors, bootable from USB or CD/DVD.
Cons: Requires creating a bootable media, the testing process can take a significant amount of time (potentially hours).
3. Third-Party RAM Testing Software (Windows)
Several third-party applications offer RAM testing functionalities within the Windows environment. These tools typically offer user-friendly interfaces and additional features beyond basic memory testing.
Pros: Convenient to use, often provides detailed reports, may offer advanced testing options.
Cons: May require installation, potentially less reliable than MemTest86 for critical error detection.
Interpreting Test Results
Understanding the results of your RAM test is crucial for accurate diagnosis. The interpretation varies depending on the tool used, but common elements include:
- Pass/Fail: A simple pass/fail indicator indicates whether any errors were detected during the test. A fail usually points to a problem with your RAM.
- Error Count: The number of errors detected during the test provides an indication of the severity of the problem. A higher error count suggests more significant issues.
- Error Location: Some tools pinpoint the specific location (address) within the RAM module where errors occurred, helping identify the faulty module.
- Test Duration: The length of the test provides context. Longer tests often uncover more subtle issues.
Troubleshooting RAM Issues
If your RAM test reveals errors, several troubleshooting steps can be taken:
- Reseat RAM Modules: Properly reseating the RAM modules can resolve issues caused by loose connections. This involves turning off the computer, opening the case, gently removing and re-inserting the RAM sticks, and then restarting the computer.
- Test Individual Modules: If you have multiple RAM modules, test them individually to isolate the faulty one. This helps pinpoint the exact module needing replacement.
- Check RAM Compatibility: Ensure the RAM modules are compatible with your motherboard and system specifications. Incorrectly configured RAM can lead to instability.
- Update BIOS: An outdated BIOS can sometimes cause compatibility issues with RAM. Updating to the latest BIOS version might resolve problems.
- Replace Faulty Modules: If a specific RAM module is identified as faulty, replacing it with a known good module is the most effective solution.
- Consider Hardware Failure: If the problems persist after trying all other troubleshooting steps, it’s possible there is a more significant hardware failure than just RAM.
Advanced Testing Techniques
For advanced users, more sophisticated testing methods exist that go beyond the basic tests discussed above. These include:
- Stress Testing: Putting your RAM under heavy load using specialized software can reveal stability issues not apparent under normal usage.
- Memory Timing Adjustments: Adjusting RAM timings in the BIOS can potentially improve stability but requires careful consideration and knowledge of your system’s capabilities.
- Hardware Monitoring Tools: Tools that monitor RAM usage and temperatures can provide insights into potential performance bottlenecks or overheating issues.
Prevention and Maintenance
While RAM failures can occur, certain practices can help prevent issues and prolong the lifespan of your RAM modules:
- Proper Handling: Avoid touching the gold connectors on the RAM modules. Handle them carefully to avoid damage.
- Regular System Maintenance: Keep your operating system and drivers updated to improve system stability and reduce potential conflicts.
- Avoid Overclocking: Pushing your RAM beyond its specifications can increase the risk of instability and failure.
- Monitor Temperatures: High RAM temperatures can contribute to errors and failures. Monitor temperatures using hardware monitoring tools.